Webhooks
- Mike Sheen
- Monica Holliday
- Julie Hanlon
- Scott Pearce
About Webhooks
Webhooks are ways of integrating Jiwa with other 3rd party API's. When an event in Jiwa occurs (such as when a product is created), a 3rd party API can be notified instantly using webhooks.
Webhooks eliminate the need for polling, which can be inefficient and introduce latency between the event occurrence and when an action in response to that event occurs.
A graphical depiction of the webhooks workflow within Jiwa is shown below.
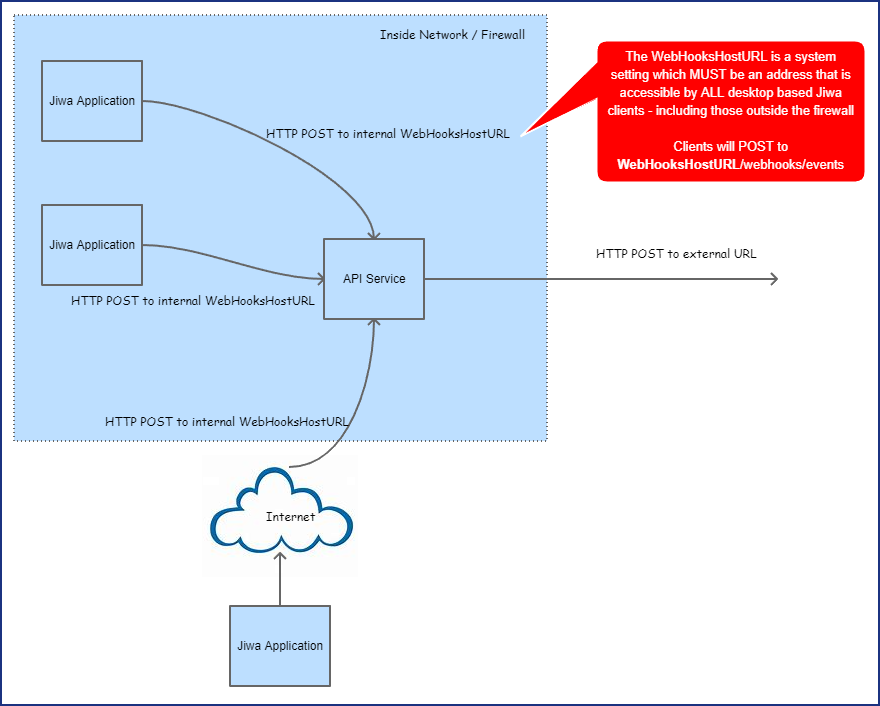
The WebHooksHostURL system setting should be a valid URL accessible by all Jiwa clients. If this URL is not reachable, webhooks will not be sent to subscribers until the REST API service is restarted.
Implementation
Webhooks in Jiwa are implemented by augmenting the existing REST API with webhook functionality via a plugin. It is based on a subscriber / subscription model.
Webhooks requires Jiwa 07.02.01.00 or later
Versions earlier than Jiwa 07.02.01 used a plugin to extend the REST API to add functionality. This is no longer supported and if Webhooks are required then you must update to Jiwa 07.02.01 or later.
Subscribers are defined in Jiwa, and a subscriber once given their SubscriberID can register a subscription to the possible webhooks available in Jiwa. When events occur in Jiwa, a message is generated and sent to the webhook subscriptions. The result of that message is then stored in a Message response.
Messages which fail to be sent to a subscriber are queued for retry based on some system settings.
Subscribers can also remove their own subscriptions and inspect what messages have been sent or attempted to be sent and the current status of the message.
All webhook messages are sent as a POST operation with any relevant document DTO as the body.
Enabling Webhooks
Webhooks are enabled when the REST API plugin is enabled, and either the Self Hosted service or IIS are configured and running.
An additional step is to configure the WebhooksHostURL system setting of the REST API Plugin. This can be done via the System Configuration form, on the REST API tab.
The value should be the URL of your REST API reachable by internal Jiwa users. For webhooks to function, each Jiwa client will POST events to this internal URL and the service will then forward those messages to subscribers.
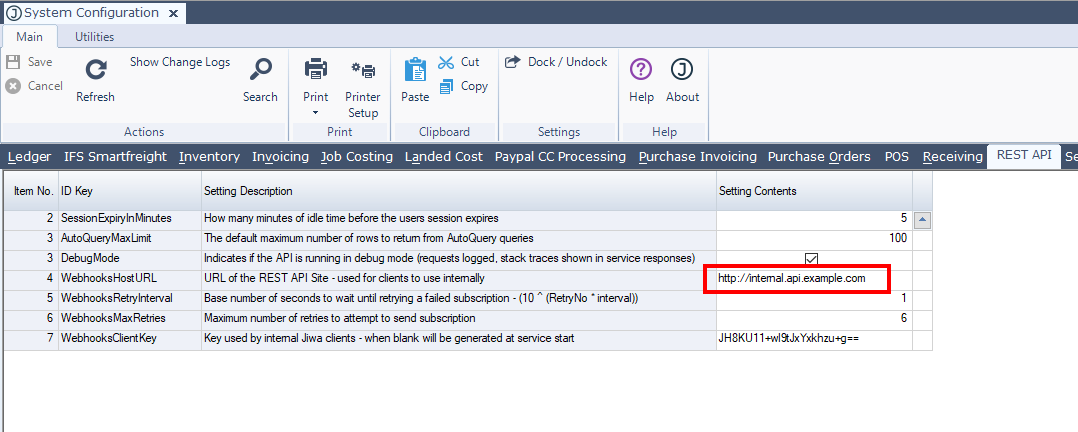
NOTE: In most circumstances the value for the WebhooksHostURL should not be http(s)://localhost or http(s)://127.0.0.1 - this must be the address your Jiwa users can reach via a HTTP POST. If all your users are inside the firewall this can be the machine DNS name or local IP Address. Check if the WebhooksHostURL is correct by putting the value of WebhooksHostURL in a browser address bar on all the Jiwa client machines - the REST API metadata page should appear.
Operations for use by Subscribers
The following is a list of operations subscribers can use to manage their subscriptions and related messages and message responses. Note no authentication is required.
List Webhook Events
Example Response:
[
	{
	 "Name":"debtor.created",
	 "Description":"Occurs when a new debtor (customer) is created"
	},
	{
	 "Name":"debtor.deleted",
	 "Description":"Occurs when a debtor (customer) is deleted"
	}
]
The possible events that are published by default are listed in the following table. A plugin can add more events as required.
| Event | Description |
|---|---|
| bookin.created | Occurs when a new book in is created |
| bookin.updated | Occurs when a book in is modified |
| creditor.created | Occurs when a new creditor (supplier) is created |
| creditor.deleted | Occurs when a creditor (supplier) is deleted |
| creditor.updated | Occurs when a creditor (supplier) is modified |
| creditorclassification.created | Occurs when a new creditor classification is created |
| creditorclassification.deleted | Occurs when a creditor classification is deleted |
| creditorclassification.updated | Occurs when a creditor classification is modified |
| debtor.created | Occurs when a new debtor (customer) is created |
| debtor.deleted | Occurs when a debtor (customer) is deleted |
| debtor.updated | Occurs when a debtor (customer) is modified |
| debtorcategory.created | Occurs when a new debtor category is created |
| debtorcategory.deleted | Occurs when a debtor category is deleted |
| debtorcategory.updated | Occurs when a debtor category is modified |
| debtorclassification.created | Occurs when a new debtor classification is created |
| debtorclassification.deleted | Occurs when a debtor classification is deleted |
| debtorclassification.updated | Occurs when a debtor classification is modified |
| goodsreceivednote.created | Occurs when a new goods received note is created |
| goodsreceivednote.updated | Occurs when a goods received note is modified |
| inventory.created | Occurs when a new inventory item (product) is created |
| inventory.deleted | Occurs when an inventory item (product) is deleted |
| inventory.updated | Occurs when an inventory item (product) is modified |
| inventory.stocklevel | Occurs when an inventory item stock level changes |
| inventorycategory.created | Occurs when a new inventory category is created |
| inventorycategory.deleted | Occurs when an inventory category is deleted |
| inventorycategory.updated | Occurs when an inventory category is modified |
| inventoryclassification.created | Occurs when a new inventory classification is created |
| inventoryclassification.deleted | Occurs when an inventory classification is deleted |
| inventoryclassification.updated | Occurs when an inventory classification is modified |
| purchaseorder.created | Occurs when a new purchase order is created |
| purchaseorder.deleted | Occurs when a purchase order is deleted |
| purchaseorder.updated | Occurs when a purchase order is modified |
| salesorder.created | Occurs when a new sales order is created |
| salesorder.updated | Occurs when a sales order is modified |
| salesquote.created | Occurs when a new sales quote is created |
| salesquote.updated | Occurs when a sales quote is modified |
| shipment.created | Occurs when a new shipment is created |
| shipment.updated | Occurs when a shipment is modified |
| warehousetransferin.created | Occurs when a new warehouse transfer in is created |
| warehousetransferin.updated | Occurs when a warehouse transfer in is modified |
| warehousetransferout.created | Occurs when a new warehouse transfer out is created |
| warehousetransferout.updated | Occurs when a warehouse transfer out is modified |
Add a new Subscriber
Subscribers are not intended to be added by external source, and as such require authentication - see Authenticating under Consuming the REST API
Once a subscriber is added, the SubscriberID (RecID returned by the POST to /Webhooks/Subscribers) is the unique identifier you would perhaps provide to external to allow them to manage their own subscriptions.
Add a new subscriber
Add a new Subscription (Subscribe to a webhook event)
Add a subscription for Subscriber with ID b25a2922-931b-4447-9160-3984b91c02f4 - when a sales order is created, perform a POST operation on the URL https://example.com/api/dosomething
List all subscriptions for a Subscriber
Example Response:
[
	{
	 "RecID":"2a84b900-d178-4de4-8d11-18b318c0276b",
	 "SY_WebhookSubscriber_RecID":"b25a2922-931b-4447-9160-3984b91c02f4",
	 "EventName":"salesorder.created",
	 "URL":"https://example.com/api/dosomething",
	 "ItemNo":1,
	 "LastSavedDateTime":"\/Date(1511400032893-0000)\/",
	 "RowHash":"AAAAAAAAmns="
	}
]
Delete a Subscribers Subscription
Given Subscriber "b25a2922-931b-4447-9160-3984b91c02f4" has an existing subscription with ID "2a84b900-d178-4de4-8d11-18b318c0276b", delete it
Messages
This is a queryable request, meaning filtering, pagination, ordering and limiting what fields are returned is possible through either URL parameters or DTO property values
List all Messages for a subscriber
This is a queryable request, meaning filtering, pagination, ordering and limiting what fields are returned is possible through either URL parameters or DTO property values.
Example Response:
{
	"Results" : [{
			"SubscriberID" : "b25a2922-931b-4447-9160-3984b91c02f4",
			"SubscriptionID" : "2a84b900-d178-4de4-8d11-18b318c0276b",
			"MessageID" : "7d00f575-1159-49b4-bdd5-5b560d2dcd21",
			"EventName" : "salesorder.created",
			"URL" : "https://example.com/api/dosomething",
			"Body" : "DTO Json would be in here",
			"ItemNo" : 3,
			"Status" : 2,
			"Retries" : 6,
			"AddedDateTime" : "\/Date(1511372206197-0000)\/",
			"LastSavedDateTime" : "\/Date(1511694312630-0000)\/",
            "LastMessageResponseHTTPCode" : 404
			"LastMessageResponseMessage" : "The remote name could not be resolved: 'example.com'"
		}
	],
	"Meta" : {}
}
Filtered, Curated List of Messages for a subscriber
Example Response:
{
	"Results" : [{
			"EventName" : "salesorder.created",
			"URL" : "https://example.com/api/dosomething",
			"Retries" : 6,
		}
	],
	"Meta" : {}
}
Message Statuses
| Status Value | Description |
|---|---|
| 0 | Not sent |
| 1 | Successful |
| 2 | Failed, Retry Pending |
| 3 | Failed |
Delete a Message
Given Subscriber "b25a2922-931b-4447-9160-3984b91c02f4" has an existing subscription with ID "2a84b900-d178-4de4-8d11-18b318c0276b" which in turn has a message with ID "7d00f575-1159-49b4-bdd5-5b560d2dcd21", delete it
List all Message Responses for a Subscriber
This is a queryable request, meaning filtering, pagination, ordering and limiting what fields are returned is possible through either URL parameters or DTO property values.
Example Response:
{
	"Results" : [{
			"SubscriberID" : "b25a2922-931b-4447-9160-3984b91c02f4",
			"SubscriptionID" : "2a84b900-d178-4de4-8d11-18b318c0276b",
			"MessageID" : "7d00f575-1159-49b4-bdd5-5b560d2dcd21",
			"MessageResponseID" : "9c788af7-697a-4d10-8241-1575b4000384",
			"EventName" : "salesorder.created",
			"URL" : "https://example.com/api/dosomething",
			"Body" : "Body DTO In here",
			"MessageItemNo" : 3,
			"Status" : 2,
			"Retries" : 6,
			"AddedDateTime" : "\/Date(1511372206197-0000)\/",
			"MessageLastSavedDateTime" : "\/Date(1511694312630-0000)\/",
			"HTTPCode" : 404,
			"Message" : "The remote server returned an error: (404) Not Found.",
			"ItemNo" : 4,
			"LastSavedDateTime" : "\/Date(1511372321263-0000)\/"
		}, {
			"SubscriberID" : "b25a2922-931b-4447-9160-3984b91c02f4",
			"SubscriptionID" : "2a84b900-d178-4de4-8d11-18b318c0276b",
			"MessageID" : "7d00f575-1159-49b4-bdd5-5b560d2dcd21",
			"MessageResponseID" : "805c9edd-b807-4123-a3fd-1ce3f5b403dd",
			"EventName" : "salesorder.created",
			"URL" : "https://example.com/api/dosomething",
			"Body" : "Body DTO In here",
			"MessageItemNo" : 3,
			"Status" : 2,
			"Retries" : 6,
			"AddedDateTime" : "\/Date(1511372206197-0000)\/",
			"MessageLastSavedDateTime" : "\/Date(1511694312630-0000)\/",
			"HTTPCode" : 404,
			"Message" : "The remote server returned an error: (404) Not Found.",
			"ItemNo" : 3,
			"LastSavedDateTime" : "\/Date(1511372220007-0000)\/"
		}
	],
	"Meta" : {}
}
Message Retries & Resilience
Webhook messages are sent to subscribers as they occur in Jiwa immediately and asynchronously - meaning it happens in the background and the time taken to send the message does not delay or impact users of Jiwa.
If a message should fail, then it is retried based on a time schedule. All messages are sent by the REST API service, not the Jiwa clients themselves - so the Jiwa client that originally generated the webhook event does not need to remain powered on.
Messages are persisted to a SQL Table SY_WebhookMessage, and that table is read when the REST API Service starts and unsent messages are queued for delivery. By default messages are retried after 1 second, then 10 seconds, 100 seconds, and so on until after the 6th retry the message if marked as failed (Status 3) and no longer retried.
System settings under the "REST API Webhooks" tab of the system configuration form control how long the retry interval is, and the maximum number of retries to attempt.
This strategy of persisting the messages to an SQL table and retrying delivery of failed messages at growing intervals provides the resilience required to integrate with other API's
Creating a Designated Webhook Message Handler
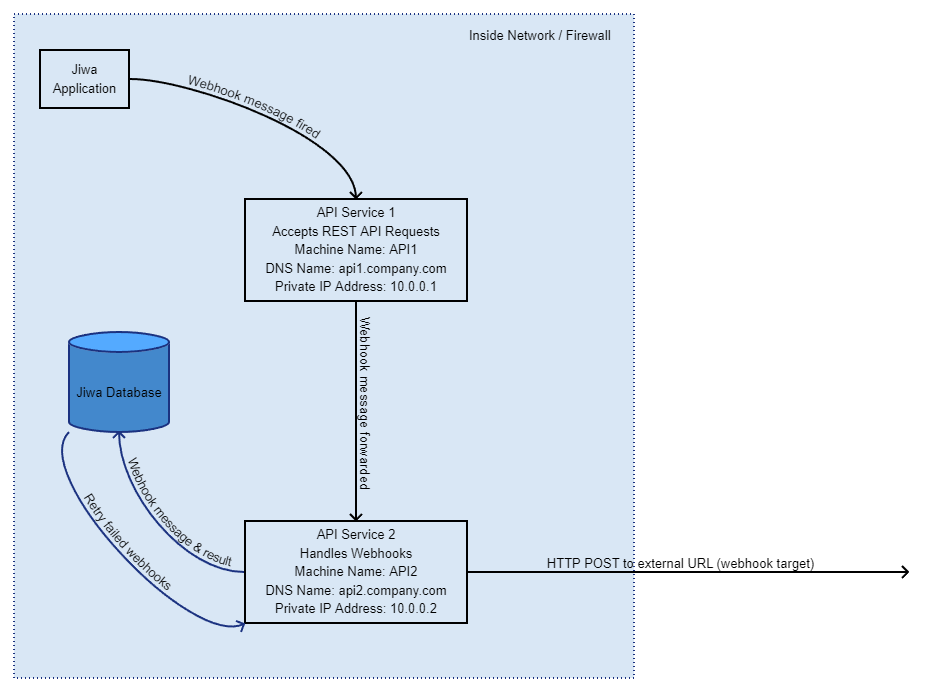
By default, the API Service handles REST API requests and also manages webhook messaging and retries. It is possible to separate these concerns, which can be useful in spreading the load across computing resources. The topology is simple: two REST API Services are configured - one handles the incoming REST API requests, and the other handles webhook messaging including retries. There are 3 system settings involved that must be set appropriately:
- WebhooksHostURL - This is the URL of the main REST API service. This URL should be accessible by all clients. It is this URL to which all webhook messages are initially sent by clients.
- WebhooksHostName - This setting defines the NetBIOS name of the machine (i.e. the windows machine name) that is running the instance of the REST API service that will be responsible for sending webhook messages to their target, as well as handling retries if the target is not responding. This is the same machine as that defined in the "WebhooksHostRetrierURL" system setting.
- WebhooksHostRetrierURL - This is the URL of the machine that is running the instance of the REST API service that will be responsible for sending webhook messages to their target, as well as handling retries if the target is not responding. This URL need only be accessible to the machine defined in the WebhooksHostURL. In fact, good security practices would dictate that the URL / port (i.e. port 80) should only be accessible to the WebhooksHostURL machine. This is the same machine as that defined in the "WebhooksHostName" system setting.
Below is a diagram illustrating the setup:
Here is a step-by-step tutorial that demonstrates setting up a designated webhook message handler.
Step 1 - Involved Machines
Decide which machine is going to run the REST API Service that handles requests, and which machine will run the REST API Service that acts as the webhook message handler. In this tutorial there is also a third machine defined - the SQL Server hosting the Jiwa database:
- Machine 1:
- NetBIOS (windows) name: API1
- DNS name: api1.company.com
- Private IP Address: 10.0.0.1
- Machine 2:
- NetBIOS (windows) name: API2
- DNS name: api.company.com
- Private IP Address: 10.0.0.2
- Machine 3:
- NetBIOS (windows) name: SQL
- DNS name: sql.company.com
- Private IP Address: 10.0.0.3
Note that all machines are on the same subnet (10.0.0.0/24), and DNS names are already configured (configuring DNS names is outside the scope of this document).
Step 2 - Machine 3 Configuration (SQL)
We start with this machine as this is where the Jiwa databases will be hosted. You likely already have this machine configured and running. In this tutorial the machine is Windows Server 2022. On this, we will be installing and configuring Microsoft SQL Server 2022, and then in subsequent steps we shall create a Jiwa demonstration database for use during this tutorial.
- Install SQL Server 2022 trial. In our testing we used the SQL Server On-premises "Evaluation" edition.

Use defaults except for:
"Feature Selection" page - tick Database Engine Services.
"Database Engine Configuration" page - under "Authentication mode" section choose "Mixed Mode" and define an "sa" password. Also click the "Add Current User" button on this dialog.
- Add a firewall rule to allow sqlsvr.exe through.
Open "Windows Defender Firewall" (open the Start menu and type "Firewall").

On the "Windows Defender Firewall" screen, click on "Allow an app or feature through Windows Defender Firewall".

On the "Allowed Applications" screen click on the "Allow another app..." button.

5. Click "Browse...", navigate to the sqlservr exe and then click "Open" (for SQL Server 2022 the default location of sqlservr.exe is "C:\Program Files\Microsoft SQL Server\MSSQL16.MSSQLSERVER\MSSQL\Binn\".

Click "Add", then "OK" to save the new firewall rule.

Step 3 - Machine 1 Configuration (API1)
This machine will handle REST API requests. It also receives webhook messages but will forward those over to API2 for processing.
- Install Jiwa 7.2.1 SR19 or later.
- Create a Jiwa demonstration database on the SQL machine using the Jiwa client installed in the previous step (remember to use the machine name, "SQL", or the machine's private IP address, 10.0.0.3, to connect).
- Import the latest REST API plugin into the database. The REST API plugin must be v7.2.1.62 or later. This is the version that ships with Jiwa 7.2.1 SR19. Follow the instructions given here to extract the REST API plugin from the installed service release files.
- Configure the REST API system settings as below and then save the plugin.
- WebhooksHostURL = http://api1.company.com
- WebhooksHostName = API2
- WebhooksHostRetrierURL = http://api2.company.com
- Configure the Jiwa 7 API windows service by editing JiwaAPISelfHostedService.exe.config (by default found at C:\Program Files (x86)\Jiwa Financials\Jiwa 7) with these values:
- ServerName = SQL
- In services.msc, change the Jiwa 7 API service to have a "Startup type" of automatic, then start the service. You can use the windows event viewer to troubleshoot any startup errors.
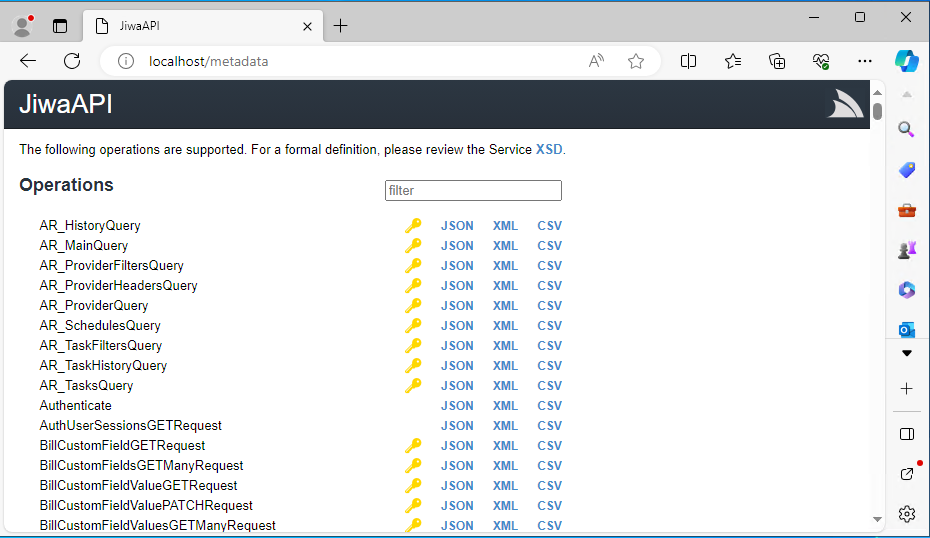
- Check that the Jiwa 7 API service is listening by opening a web browser and visiting http://localhost on this machine (API1). You should see something similar to the following:
- To allow other machines to also reach the API listening on this machine, you must open TCP port 80 on the windows firewall:
Open "Windows Defender Firewall" (open the Start menu and type "Firewall").
Click on "Advanced settings".

Click on "Inbound Rules"

Click on "New Rule..."

Choose "Port" then click the "Next" button.

Enter a value of 80 for the "Specific local ports" option then click the "Next" button.

Click the "Next" button again (the default value of "Allow the connection" on this screen is OK).
Click the "Next" button again (the default values of ticked for Domain, Private, and Public is OK).
Give your new firewall rule a name, i.e. "Port 80 TCP", then click "Finish".
Test that other machines can access the API service running on API1 by logging into the SQL machine and using a web browser to visit http://api1.company.com.
Tip
If your machine is actually a virtual machine running on the Microsoft Azure platform, you will also need to create firewall rules at the Azure level to allow TCP on port 80 to reach the machine.
- Edit the hosts file on API1 so that operations between internal machines use the internal network and do not try to go out onto the Internet and then back into the internal network.
Open the file C:\Windows\System32\drivers\etc\hosts in notepad.exe
Add the following lines:
127.0.0.1 api1.company.com
10.0.0.2 api2.company.com
Be sure to remove the # as this denotes a commented-out line
Save and close the hosts file.
Step 4 - Machine 2 Configuration (API2)
This machine (API2) will handle webhook messages. The API1 machine will forward any webhook messages it receives via the REST API plugin system setting "WebhooksHostURL" to this machine (API2). API2 then sends the webhook message off to its target, and handles retries if required. API2 records results in the SY_WebhookMessage and SY_WebhookMessageResponse tables in the Jiwa database - you should look here to troubleshoot non-sent messages.
- Install Jiwa 7.2.1 SR19 or later.
- Configure the Jiwa 7 API windows service by editing JiwaAPISelfHostedService.exe.config (by default found at C:\Program Files (x86)\Jiwa Financials\Jiwa 7) with these values:
- ServerName = SQL
- In services.msc, change the Jiwa 7 API service to have a "Startup type" of automatic, then start the service. You can use the windows event viewer to troubleshoot any startup errors.
- Check that the Jiwa 7 API service is listening by opening a web browser and visiting http://localhost on this machine (API2). You should see something similar to the following:
- We need to allow port 80 TCP through the firewall, but it is only API1 that requires access (to forward on to this machine the webhook messages it receives). To this end, we shall configure a firewall rule that opens TCP port 80 only to the API1 machine.
Open "Windows Defender Firewall" (open the Start menu and type "Firewall").
Click on "Advanced settings".
Click on "Inbound Rules"
Click on "New Rule..."
Choose "Port" then click the "Next" button.
Enter a value of 80 for the "Specific local ports" option then click the "Next" button.
Click the "Next" button again (the default value of "Allow the connection" on this screen is OK).
Click the "Next" button again (the default values of ticked for Domain, Private, and Public is OK).
Give your new firewall rule a name, i.e. "Port 80 TCP - API1 Only", then click "Finish".
Now we need to edit the properties of the new rule to only allow Port 80 TCP for a specific machine - in our case API1. Right click on the new rule and choose "Properties".
On the properties screen, choose the "Scope" tab.

In the "Local IP address:"" section, choose "These IP addresses:", and add the private IP address of this machine (API2 - 10.0.0.2) - this means port 80 TCP is only allowed through the firewall via the internal network interface. In the "Remote IP address:" section, choose "These IP addresses:", and add the private IP address of API1 (10.0.0.1) - this means only connections to port 80 TCP coming from API1 will be allowed through. The net result is that "only connections to port 80 TCP via the internal network interface will be allowed, and the connection must be from the API1 machine (10.0.0.1)".

Test that the API1 can access the API service running on API2 by logging into the API1 machine and using a web browser to visit http://api2.company.com. Test that other machines can NOT access the API service running on API2 by logging into the SQL machine and using a web browser to visit http://api2.company.com.
- Edit the hosts file on API1 so that operations between internal machines use the internal network and do not try to go out onto the Internet and then back into the internal network.
Open the file C:\Windows\System32\drivers\etc\hosts in notepad.exe
Add the following lines:
127.0.0.1 api2.company.com
10.0.0.1 api1.company.com
Save and close the hosts file.
Step 5 - Test Webhooks
We can test webhooks by creating a webhook subscriber, adding a webhook subscription, and using a target provided to us by https://webhook.site. https://webhook.site is a website that can be used for testing webhooks. It tells us when a webhook message is received, as well as the IP address it came from. We want to make sure that our webhook messages always come from the API2 machine, and not API1.
- Go to https://webhook.site, clear any requests if some exist, then copy the URL provided under the "Your unique URL" heading. Leave this website open in your web browser.
- Follow the tutorial here to add a webhook subscriber and a webhook subscription, however use the URL copied from the step above for the subscription "URL" value.
- Log in to Jiwa on API1.
- Perform a stock transfer to cause the webhook created previously to fire.
Open Inventory → Stock Transfer.
Click the "New" button on the ribbon menu.
Enter 1170 in the "To Part No." column.
Enter 1 in the "Transfer Quantity" column.
Save.
Activate.
- Go back to the https://webhook.site page you left open in the web browser. Check that you have received a request (this is the webhook that we fired), and make sure that the "Host" IP address of the request is the public IP address of the API2 machine (the machine we designated for handling webhooks). The "Host" IP address can be found in the "Request Details" section of the https://webhook.site page when a request is selected on the left-hand side.
If nothing was received on https://webhook.site, troubleshoot by looking in the SY_WebhookMessage and SY_WebhookMessageResponse tables in the Jiwa database.
If there are no messages in the SY_WebhookMessage table, go back over this tutorial, including the creation of the subscription, and ensure all settings are correct.
Tutorial - Using SwaggerUI to add a subscription
In this step-by-step example, we show how to add a subscription to the inventory.stocklevel webhook, so that a http endpoint https://example.com/api/dosomething is invoked whenever the stock level for a product changes.
Step 1 - Visit the SwaggerUI page
Visit the /swagger-ui route of your api in a web browser. For example, for our demo Jiwa api it is https://api.jiwa.com.au/swagger-ui/
Step 2 - Authenticate
Locate and expand the auth section and then expand the section for GET /auth. Enter the UserName and password fields.
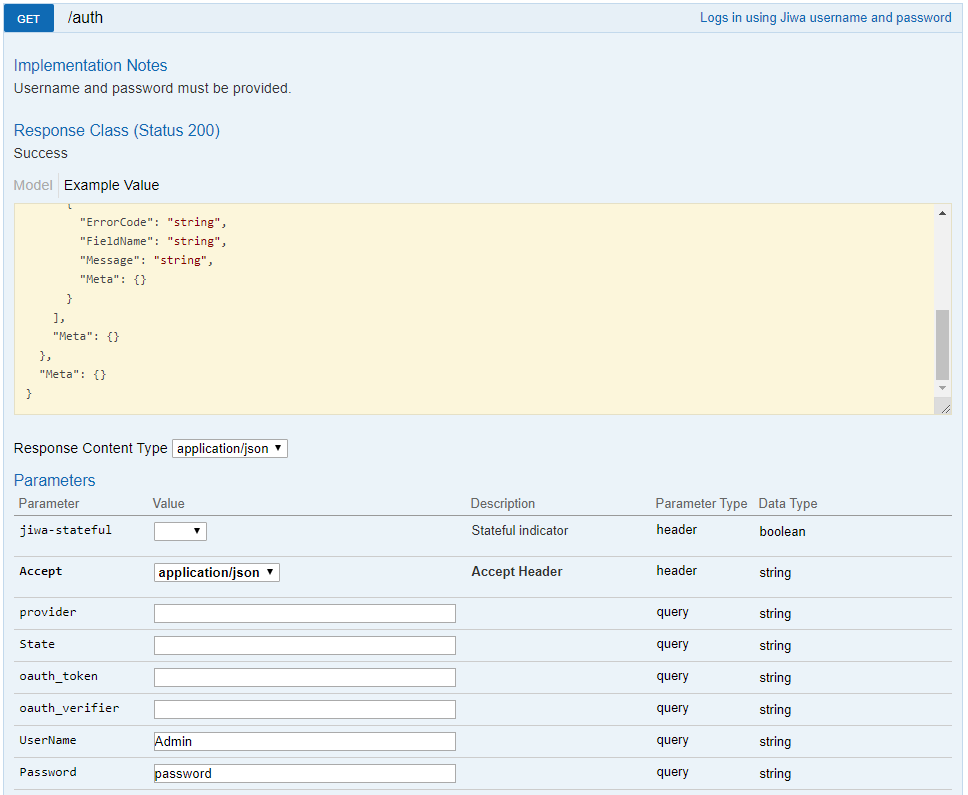
Press the Try it out! button
![]()
Step 3 - Create a Subscriber
Locate and expand the Webhooks section and then expand the section for POST /Webhooks/Subscribers.
Change the Parameter content type: to be application/json.
Click the json fragment in the Example Value area to pre-populate the body with the example json.
Edit the body to set your desired Name for the subscriber - "Test Subscriber" is shown below.
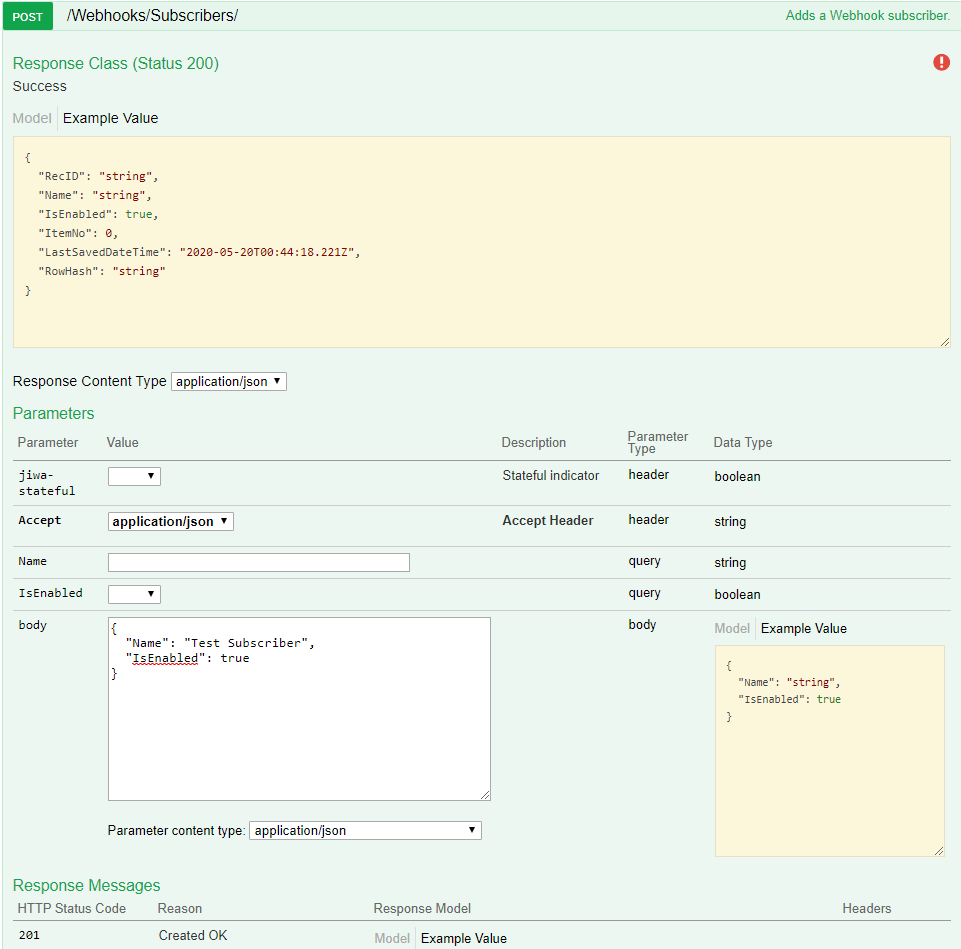
Press the Try it out! button
![]()
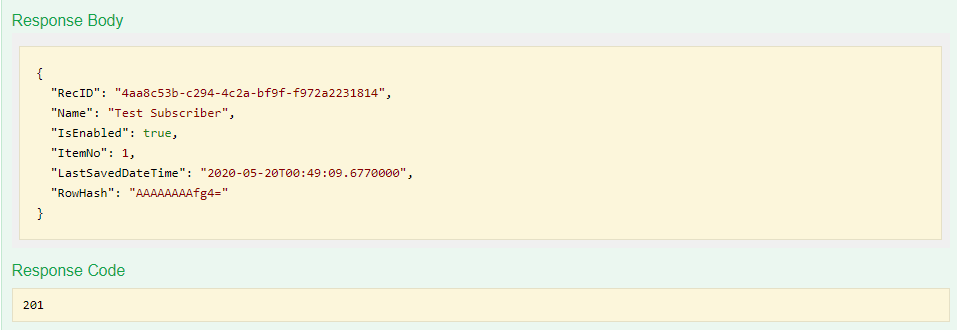
The response will be shown. The RecID in the response is the unique identifier for the subscriber - shown as 4aa8c53b-c294-4c2a-bf9f-f972a2231814 below. This will be needed for the next step, so select and copy the RecID value.
Step 4 - Create a Subscription
Locate and expand the Webhooks section and then expand the section for POST /Webhooks/Subscribers/{SubscriberID}/Subscriptions/.
Change the Parameter content type: to be application/json.
Click the json fragment in the Example Value area to pre-populate the body with the example json.
Edit the body to set the SubscriberID this is the RecID returned in the response of the previous step creating a subscription - "4aa8c53b-c294-4c2a-bf9f-f972a2231814" is shown below.
Edit the body to set your desired URL for the subscription - "https://example.com/api/dosomething" is shown below.
Edit the body to set your desired EventName for the subscription - "inventory.stocklevel" is shown below.
If required, set any headers the external system requires - the example below adds a header for setting an api key - the request POST sent to https://example.com/api/dosomething will contain these headers.
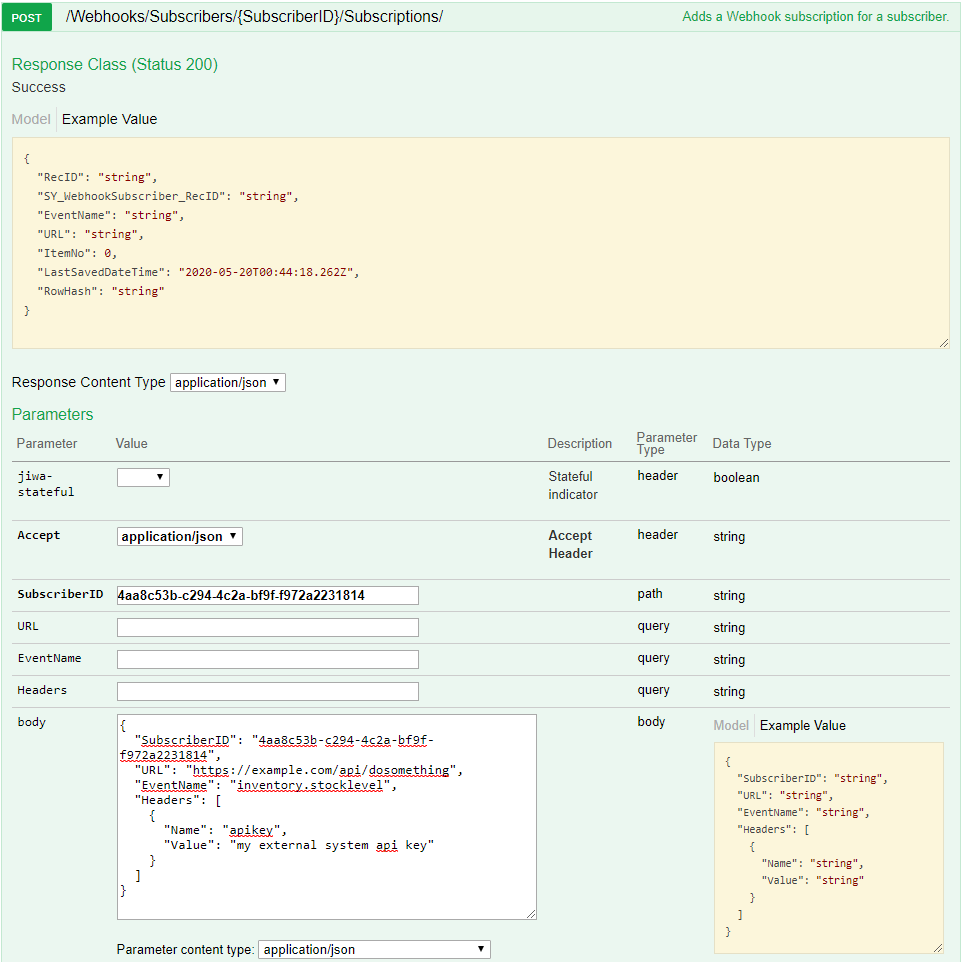
Press the Try it out! button
![]()
The response will be returned.
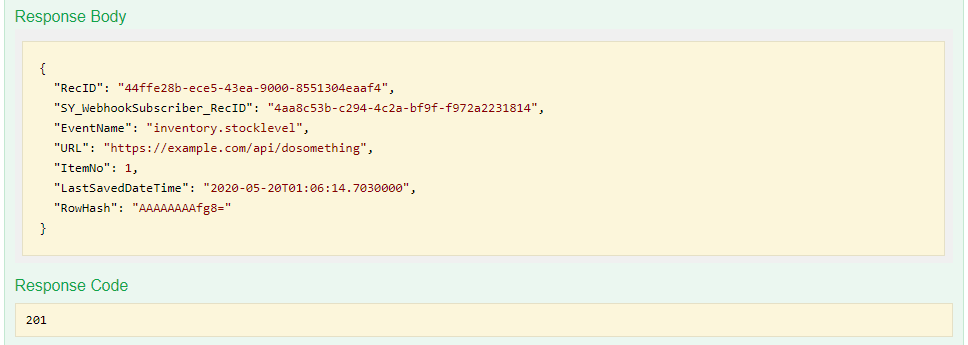
Once the above steps are completed, whenever a product stock level changes in Jiwa, a POST on the URL https://example.com/api/dosomething with a DTO containing the stock level information will be performed.